Enhancements to the CloudStarter Plan: More Power at No Extra Cost

At MDDHosting, our mission has always been anchored in serving our customers with excellence. In line with this commitment, we’re eager to share some exciting news regarding our CloudStarter plan, which many of our valued clients are currently using.

Background

When we introduced the CloudStarter plan, it was designed to cater to lightweight websites. However, as the digital landscape evolved, so did the aspirations of our customers. We observed an increasing number of users leveraging the CloudStarter plan for more resource-intensive platforms, such as multiple WordPress installations and advanced Node.JS applications.

Introducing the Upgrade

To ensure that our users continue to enjoy a seamless online experience, we’re rolling out significant enhancements to the CloudStarter plan:

  • CPU Core Allocation: Now at a full 100%, up from the previous 50% allocation.
  • RAM: Doubled to 1GB (1024MB) from the earlier 512MB.

What makes this even more exciting? This substantial boost in resources comes at absolutely no additional cost to our current CloudStarter customers.

A Note on Grandfathering

It’s important to mention that while the CloudStarter plan is no longer available for new subscribers, current users need not worry. If you’re on this plan, you can choose to continue using it for as long as you desire, benefiting from the very enhancements we’re announcing today.

What You Need to Do

Absolutely nothing! The improvements will be applied automatically to all existing CloudStarter accounts. Should you have any questions or need further information, our dedicated support team is always on standby to assist.

In Conclusion

Your trust, feedback, and loyalty have been instrumental in driving these positive changes. We’re thrilled to be a part of your online journey and are committed to offering you the best hosting experience.

Thank you for being a valued member of the MDDHosting family. Stay tuned for more updates and improvements in the future!

Understanding TTFB: Why Lower TTFB Isn’t Always Better

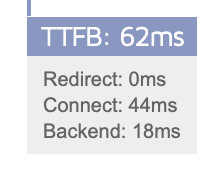
TTFB: 62ms

Time to First Byte (TTFB) is a metric used to measure the responsiveness of a web server. It is the time taken for the server to send the first byte of data to the client. While a lower TTFB is generally desirable, it’s not always the best indicator of overall website performance. In this blog post, we will explore the relationship between TTFB and PHP output buffering, and discuss how optimizing for a low TTFB can sometimes be misleading.

TTFB and PHP Output Buffering

TTFB can be influenced by various factors, such as network latency, server processing time, and PHP output buffering. PHP output buffering is a technique where the server buffers the output of a script before sending it to the client. This can help improve performance by allowing the server to send larger chunks of data at once, rather than sending small bits of data as they become available. Additionally, output buffering can be beneficial when running a site built with plugins from various developers, such as is common with WordPress. In these situations, different plugins may send headers at different times, and without output buffering, this can cause errors as the server is only allowed to return response headers once.

However, focusing on a low TTFB can lead to a false sense of optimization. For example, you can artificially deflate TTFB by sending a single byte of data immediately before doing any significant processing and flushing the output buffer. This will result in a lower TTFB, but the overall load time for the user remains the same. In other words, a low TTFB doesn’t always equate to a better user experience.

Continue reading “Understanding TTFB: Why Lower TTFB Isn’t Always Better”

MDDHosting ObjectCache – Memcached and Redis Manager Updated

MDDHosting ObjectCache Memcached and Redis Manager

We are thrilled to announce the latest updates to our Object Cache cPanel Plugin that will help you manage Memcached and Redis more efficiently. We made management of these services even more straightforward and user-friendly.

Here’s a quick rundown of the new features:

Status Indicator: The status of the plugin is now indicated with a colored circle – green for running, yellow for starting or stopping, and red for stopped. This change will help you quickly identify the status of the plugin at a glance, without the need to check logs or other indicators.

Refresh Status Button: We have updated the “Refresh Status” link to a blue button. This change makes it more apparent that this button refreshes the status of the plugin and enables you to check for updates quickly.

Enable/Disable Button: The Enable/Disable links have been converted to buttons that are green for Enable and red for Disable. This change makes it more intuitive to turn on or off the plugin, and it also makes it easier to identify the current status. We debated between green to start, or green to show it’s already running on the buttons – let us know your thoughts!

Improved Text Display: We have made the text boxes for the socket display in a monospace font and bold. This change makes it easier to read.

Live Start/Stop Timer: We added a live timer until the next start/stop process for Memcached and Redis. The timer provides real-time information on when the services will start or stop next. This is especially useful when you need to make sure that the services are up and running before you begin working.

These updates are now live and available for use. We believe that these improvements will help our users manage Memcached and Redis more efficiently, saving them time and effort. If you have any feedback or suggestions, we’d love to hear from you!

Migrating WordPress Manually

Migrating a WordPress website from your former provider to MDDHosting can be a relatively straightforward process, but there are several steps you will need to follow in order to do it successfully. In this article, we will walk you through each of the steps involved in the migration process, so you can get your website up and running on your account with us as quickly and easily as possible.

  1. First, you will need to make a backup of your WordPress website. This will ensure that you have a copy of all of your website’s files and data, in case anything goes wrong during the migration process. You can create a backup of your website using the built-in backup tools in your former provider’s control panel, or by using a WordPress plugin like UpdraftPlus.

  2. Once you have a backup of your website, you will need to download it to your local computer. This will allow you to access the files and data needed for the migration process.

  3. Next, you will need to upload your WordPress website’s files to your account with us. This will include all of the files and folders that make up your website, such as your theme, plugins, and media files. You can do this using an FTP client like FileZilla, or by using the File Manager in your cPanel control panel.

  4. After your website’s files have been uploaded to your account, you will need to create a new database. This will be where your WordPress website’s data will be stored once the migration is complete. You can easily create a new database using the “MySQL” section of your cPanel control panel.  We suggest using the “MySQL Wizard” to create a database and associated username and noting those details when you create it.

  5. Once you have created a new database, you can restore your WordPress website’s data into it using the “Backups” section of cPanel or by using phpMyAdmin in the cPanel. This will allow your website to access the data it needs to function properly.

  6. Finally, you will need to update the database connection details in your WordPress website’s “wp-config.php” file to point to the new database. This will allow your website to access the data it needs to function properly.

Once you have completed all of these steps, your WordPress website should be fully migrated to your new MDDHosting account. You can then test your website to ensure that it is functioning properly, and make any necessary adjustments to get it up and running smoothly.

Please keep in mind that we are always happy to assist you in migrating websites to our services to the best of our abilities.  Don’t hesitate to reach out for help!