Migrating WordPress Manually

Migrating a WordPress website from your former provider to MDDHosting can be a relatively straightforward process, but there are several steps you will need to follow in order to do it successfully. In this article, we will walk you through each of the steps involved in the migration process, so you can get your website up and running on your account with us as quickly and easily as possible.

  1. First, you will need to make a backup of your WordPress website. This will ensure that you have a copy of all of your website’s files and data, in case anything goes wrong during the migration process. You can create a backup of your website using the built-in backup tools in your former provider’s control panel, or by using a WordPress plugin like UpdraftPlus.

  2. Once you have a backup of your website, you will need to download it to your local computer. This will allow you to access the files and data needed for the migration process.

  3. Next, you will need to upload your WordPress website’s files to your account with us. This will include all of the files and folders that make up your website, such as your theme, plugins, and media files. You can do this using an FTP client like FileZilla, or by using the File Manager in your cPanel control panel.

  4. After your website’s files have been uploaded to your account, you will need to create a new database. This will be where your WordPress website’s data will be stored once the migration is complete. You can easily create a new database using the “MySQL” section of your cPanel control panel.  We suggest using the “MySQL Wizard” to create a database and associated username and noting those details when you create it.

  5. Once you have created a new database, you can restore your WordPress website’s data into it using the “Backups” section of cPanel or by using phpMyAdmin in the cPanel. This will allow your website to access the data it needs to function properly.

  6. Finally, you will need to update the database connection details in your WordPress website’s “wp-config.php” file to point to the new database. This will allow your website to access the data it needs to function properly.

Once you have completed all of these steps, your WordPress website should be fully migrated to your new MDDHosting account. You can then test your website to ensure that it is functioning properly, and make any necessary adjustments to get it up and running smoothly.

Please keep in mind that we are always happy to assist you in migrating websites to our services to the best of our abilities.  Don’t hesitate to reach out for help!

Optimizing WordPress for Performance

Building on last week’s topic of how many visitors a hosting plan can handle is this week’s post: Optimizing WordPress for Performance. Even with the highest quality hosting and the most optimized and performant MySQL/MariaDB server poor content and database optimization can still bite you.

I am going to share with you some of the optimizations we have found that have helped our clients do more with less faster. Your results may vary and it is suggested that you take a full backup of your site, both files and database, before you make any changes.

If you are a client of ours and would like us to take a look at your WordPress site(s) please don’t hesitate to reach out. We perform optimization on a regular basis for our clients at no additional charge and we are happy to help as much a we can.

Continue reading “Optimizing WordPress for Performance”

Troubleshooting most WordPress Issues

The vast majority of support requests we receive are either about WordPress or email. This is not entirely surprising as most of our clients run WordPress sites and most also use our email services.

We are always happy to help so please do not hesitate to reach out to our support if you are having issues with your site. At minimum we can point you in the right direction and in most cases we are able to identify and resolve the issues our clients are facing even if they are not server or network level. Most issues we solve are content based but we are still happy to help!

From our experience the most common issues here lately are due to the WordPress core or Plugins updating and not supporting the version of PHP an account is set to. We just now solved an issue for a client where they were getting the “There has been a critical error on your website. Please check your site admin email inbox for instructions,” message.

In this case, and many others, we don’t generally have access to the administration email for the site so we simply enable WordPress Debugging. The process for this is fairly straightforward.

  1. Using your favorite method for editing files – be it the File Manager in your control panel or downloading the file via FTP and editing it locally – open up your “wp-config.php” file. This file is located in the base folder of your WordPress Installation.
  2. Inside of the WordPress Configuration file you will generally find a line like the one just below and you will want to change “false” to “true”:
define( 'WP_DEBUG', false );
  1. Reload the website and/or reproduce the error. In many cases you will get get a verbose error that tells you which file is having the issue. You can usually identify the plugin or theme causing the issue based upon the error.

In the instance from just before writing this post the error we were seeing was:

Parse error: syntax error, unexpected '?', expecting variable (T_VARIABLE) in /home/redacted/public_html/wp-content/plugins/woocommerce/vendor/symfony/polyfill-php80/bootstrap.php on line 29

So in this case the issue is with the WooCommerce plugin. When looking at line 29 of the referenced file we saw nothing wrong although the syntax for this line is not compatible with any version of PHP older than 7.4:

function str_contains(?string $haystack, ?string $needle): bool { return p\Php80::str_contains($haystack ?? '', $needle ?? ''); }

As there was nothing obviously wrong with this line of code – the line is intact with no obvious errors we suspected the PHP version may be at fault.

We checked the version of PHP the account was assigned to and found it on version 7.0. Moving the account to version 7.4 or newer resolved the issue and allowed the site to function as expected.

It’s very common for automatic updates, or even manual ones, to update a plugin, theme, or even the core installation to a version that does not support older versions of PHP. This is but just one example but most issues share the same initial troubleshooting steps.

Steps that you may take to investigate the issue would be to set a default theme, to disable plugins, or to even roll back the installation to a backup from when the site was known to be functioning. We do suggest taking a current backup before doing that.

If you ever have issues with your WordPress site, or any site you host with us, please don’t hesitate to reach out to our support for assistance. We have decades of experience when it comes to investigating and troubleshooting issues with websites and while we can’t make promises that we will resolve your issues we’ll do our absolute best!

Running WHMCS v6.3? Saving Product Details Bug & Resolution

whmcWe recently identified a bug in the latest versions of WHMCS including version 6.3.1.  The bug consists of unexpected behavior when modifying a client’s product details and using the “Enter” key to submit the changes when the product is a cPanel Account.  In previous versions of WHMCS you could change a field, such as the renewal price, and press “Enter” to submit the form.  Over the years we had become accustomed to changing client product settings in this manner as we found it was the most efficient way to do it.

Due to this bug when modifying the details of a client’s product you have to use the “Save” button at the bottom of the form or WHMCS attempts the new “cPanel Single Sign-On” to access the cPanel account of the product.  On the surface this may not sound like a huge deal but over the course of the day the productivity lost over such a simple issue can add up fast.  In some cases the changes entered into the product are lost and even worse the representative may not notice it happened!

As we have also identified a fix we could put in place prior to WHMCS resolving this internally – we wanted to make that available.  This fix applies to both the “blend” as well as the “v4” WHMCS Administration templates. Continue reading “Running WHMCS v6.3? Saving Product Details Bug & Resolution”

What is the HOSTS file & when should I use it?

Editing HOSTS file on OS X via Nano
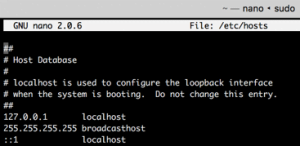
What is the HOSTS file?

The HOSTS file is used by your computer’s Operating System (Windows, OS X, Linux, etc) to map hostnames to IP Addresses.  In layman’s terms your computer will check this file for any domain it needs to resolve to an IP Address prior to querying public DNS resolvers.  The HOSTS file can be used to point a domain name to an IP Address regardless of the DNS settings for the domain.

An example of a HOSTS entry to load “www.example.com” and “example.com” from the IP address “93.184.216.34“:

93.184.216.34    www.example.com example.com

Windows may require two separate lines like so:

93.184.216.34    www.example.com
93.184.216.34    example.com

When the above records are added to your HOSTS file the result is that if you try to load that domain in your browser it will connect to that IP to make the request.  If you try pinging the domain you will find that it pings that IP as well.  What this means is that you can use this to test your site on a new server before you point your world-wide DNS there. Continue reading “What is the HOSTS file & when should I use it?”